> ## Documentation Index
> Fetch the complete documentation index at: https://doc.onetoken.one/llms.txt
> Use this file to discover all available pages before exploring further.
# Codex 安装与配置教程
## Windows 版本教程
### 系统要求
* Windows 10 或 Windows 11
* Node.js 22+
* npm 10+
* 网络连接
### 安装步骤
**前置步骤!!!**
安装 Git Bash,请访问 [Git - Downloads](https://git-scm.com/downloads) 下载对应您电脑系统的版本,之后一直点击“下一步”即可完成安装。
**1. 安装 Node.js**
访问 [Node.js 官网](https://nodejs.org/) 下载并安装最新 LTS 版本。
**2. 安装 codex**
打开命令提示符 (CMD) 或 PowerShell,运行:
```bash theme={null}
npm install -g @openai/codex
```
**3. 验证安装**
打开命令提示符 (CMD) 或 PowerShell,运行:
```bash theme={null}
codex --version
```
### 配置 API
**1. 获取 Auth Token**
访问 [onetoken.one](https://onetoken.one) 站点页面进行以下操作:
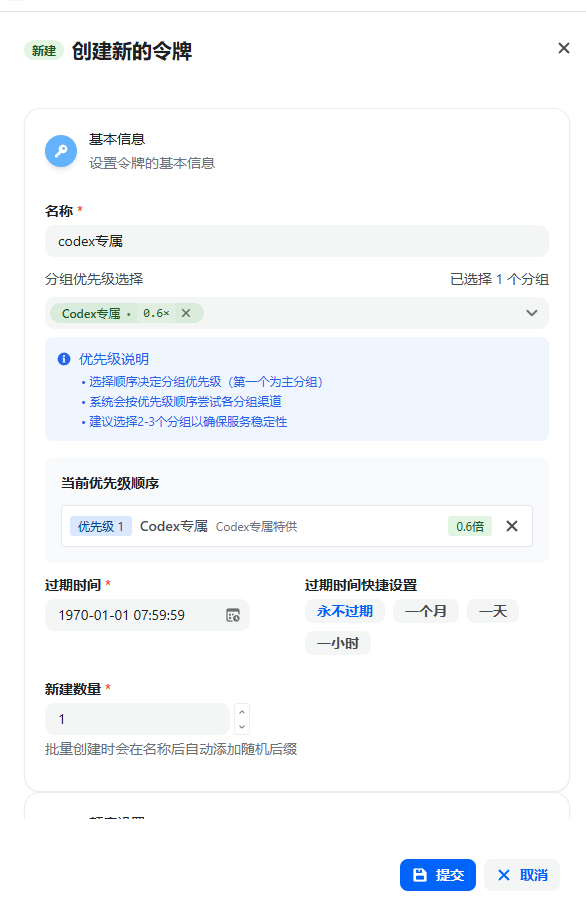
* 点击 **控制台 → API令牌** 页面
* 点击 **添加令牌**
* 令牌分组请选择:**codex专属**(务必选择此分组,否则无法使用)
* 令牌名称随意
* 额度建议:设置为 **无限额度**
* 其他选项保持默认
 **2. 配置文件**
> **重要提示**:请将下方的 `sk-xxx` 替换为您在 onetoken.one 生成的实际 API 密钥!
> **重要提示**:请将下方的 `sk-xxx` 替换为您在 onetoken.one 生成的实际 API 密钥!
> **重要提示**:请将下方的 `sk-xxx` 替换为您在 onetoken.one 生成的实际 API 密钥!
1. 进入当前用户的用户目录下的 `.codex` 文件夹中,例如:`C:\Users\testuser\.codex`。
(**注意**:如果看不到该目录,说明您没有打开 Windows 的“显示隐藏的项目”,请先在文件资源管理器中开启。)
**2. 配置文件**
> **重要提示**:请将下方的 `sk-xxx` 替换为您在 onetoken.one 生成的实际 API 密钥!
> **重要提示**:请将下方的 `sk-xxx` 替换为您在 onetoken.one 生成的实际 API 密钥!
> **重要提示**:请将下方的 `sk-xxx` 替换为您在 onetoken.one 生成的实际 API 密钥!
1. 进入当前用户的用户目录下的 `.codex` 文件夹中,例如:`C:\Users\testuser\.codex`。
(**注意**:如果看不到该目录,说明您没有打开 Windows 的“显示隐藏的项目”,请先在文件资源管理器中开启。)
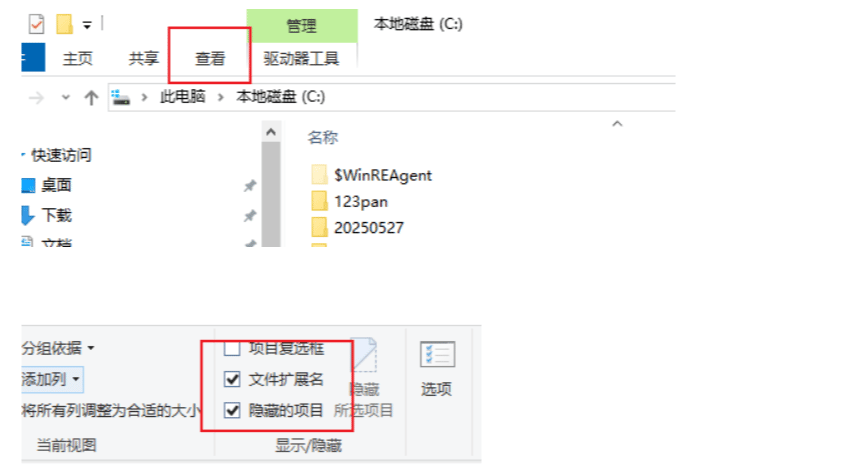 2. 如果没有 `.codex` 文件夹,请手动创建该文件夹,然后在其中创建 `config.toml` 以及 `auth.json` 两个文件。
 3. **填写配置** (需要将 `sk-xxx` 替换成您自己创建的真实 SK)。
a. `auth.json` 中的配置:
```json theme={null}
{"OPENAI_API_KEY": "sk-xxx"}
```
b. `config.toml` 中的配置(直接粘贴下面的内容即可):
`model_reasoning_effort` 可选值为 `high`, `medium`, `low`,分别代表模型思考的努力程度(高、中、低)。
```toml theme={null}
model_provider = "api111"
model = "gpt-5-codex"
model_reasoning_effort = "high"
disable_response_storage = true
preferred_auth_method = "apikey"
[model_providers.api111]
name = "api111"
base_url = "https://onetoken.one/v1"
wire_api = "responses"
```
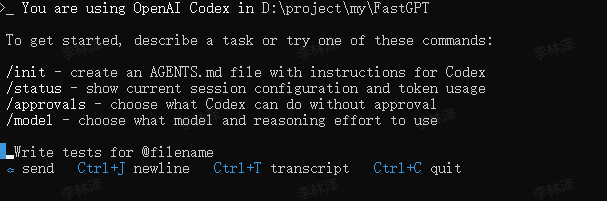
### 启动 codex
**重启终端!重启终端!重启终端!**
然后进入到您的工程目录:
```bash theme={null}
cd your-project-folder
```
运行以下命令启动:
```bash theme={null}
codex
```
3. **填写配置** (需要将 `sk-xxx` 替换成您自己创建的真实 SK)。
a. `auth.json` 中的配置:
```json theme={null}
{"OPENAI_API_KEY": "sk-xxx"}
```
b. `config.toml` 中的配置(直接粘贴下面的内容即可):
`model_reasoning_effort` 可选值为 `high`, `medium`, `low`,分别代表模型思考的努力程度(高、中、低)。
```toml theme={null}
model_provider = "api111"
model = "gpt-5-codex"
model_reasoning_effort = "high"
disable_response_storage = true
preferred_auth_method = "apikey"
[model_providers.api111]
name = "api111"
base_url = "https://onetoken.one/v1"
wire_api = "responses"
```
### 启动 codex
**重启终端!重启终端!重启终端!**
然后进入到您的工程目录:
```bash theme={null}
cd your-project-folder
```
运行以下命令启动:
```bash theme={null}
codex
```
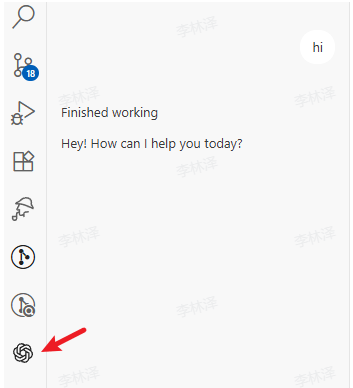
 ### VSCode 插件 codex
以上配置完成后,在 VSCode 扩展商店中搜索并安装 `codex` 即可。
### VSCode 插件 codex
以上配置完成后,在 VSCode 扩展商店中搜索并安装 `codex` 即可。
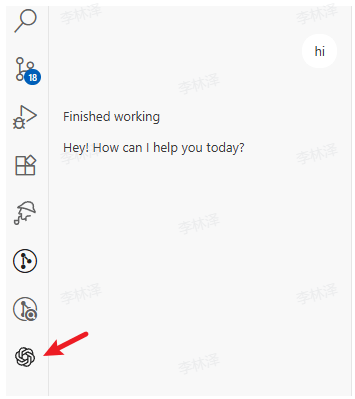
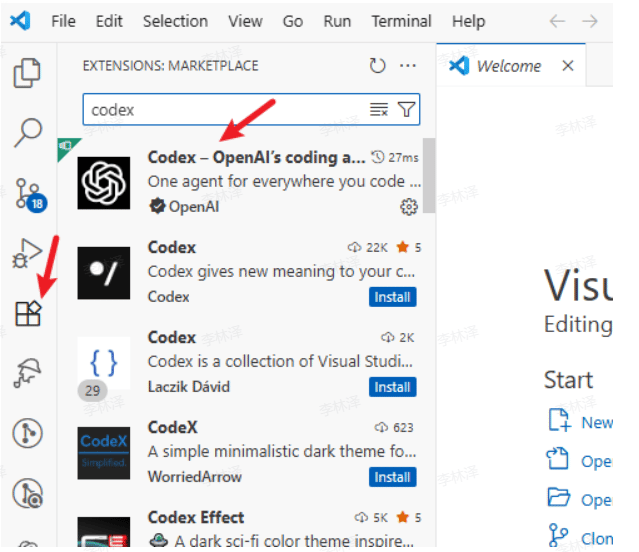 安装完成后会出现在侧边栏。
##
安装完成后会出现在侧边栏。
##  ## Mac 版本教程
### 系统要求
* macOS 12 或更高版本
* Node.js 22+
* npm 10+
* 网络连接
### 安装步骤
**1. 安装 Node.js**
* **方式一**:直接访问 [Node.js 官网](https://nodejs.org/) 下载并安装最新 LTS 版本。
* **方式二**:使用 Homebrew(推荐)
```bash theme={null}
# 如果尚未安装 Homebrew,请先运行此命令
/bin/bash -c "$(curl -fsSL [https://raw.githubusercontent.com/Homebrew/install/HEAD/install.sh](https://raw.githubusercontent.com/Homebrew/install/HEAD/install.sh))"
# 安装 Node.js
brew install node
```
**2. 安装 codex**
打开终端 (Terminal),运行(可能需要加 `sudo`):
```bash theme={null}
npm install -g @openai/codex
```
**3. 验证安装**
打开终端 (Terminal),运行:
```bash theme={null}
codex --version
```
### 配置 API
**1. 获取 Auth Token**
访问 [onetoken.one](https://onetoken.one) 站点页面进行以下操作:
* 点击 **控制台 → API令牌** 页面
* 点击 **添加令牌**
* 令牌分组请选择:**codex特供**(务必选择此分组,否则无法使用)
* 令牌名称随意
* 额度建议:设置为 **无限额度**
* 其他选项保持默认
## Mac 版本教程
### 系统要求
* macOS 12 或更高版本
* Node.js 22+
* npm 10+
* 网络连接
### 安装步骤
**1. 安装 Node.js**
* **方式一**:直接访问 [Node.js 官网](https://nodejs.org/) 下载并安装最新 LTS 版本。
* **方式二**:使用 Homebrew(推荐)
```bash theme={null}
# 如果尚未安装 Homebrew,请先运行此命令
/bin/bash -c "$(curl -fsSL [https://raw.githubusercontent.com/Homebrew/install/HEAD/install.sh](https://raw.githubusercontent.com/Homebrew/install/HEAD/install.sh))"
# 安装 Node.js
brew install node
```
**2. 安装 codex**
打开终端 (Terminal),运行(可能需要加 `sudo`):
```bash theme={null}
npm install -g @openai/codex
```
**3. 验证安装**
打开终端 (Terminal),运行:
```bash theme={null}
codex --version
```
### 配置 API
**1. 获取 Auth Token**
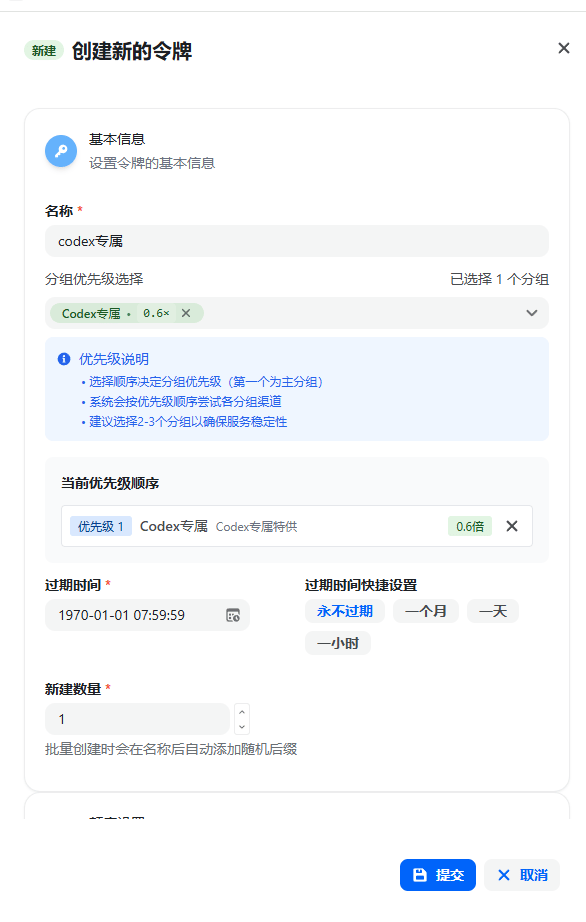
访问 [onetoken.one](https://onetoken.one) 站点页面进行以下操作:
* 点击 **控制台 → API令牌** 页面
* 点击 **添加令牌**
* 令牌分组请选择:**codex特供**(务必选择此分组,否则无法使用)
* 令牌名称随意
* 额度建议:设置为 **无限额度**
* 其他选项保持默认
 **2. 配置文件**
> **重要提示**:请将下方的 `sk-xxx` 替换为您在 onetoken.one 生成的实际 API 密钥!
> **重要提示**:请将下方的 `sk-xxx` 替换为您在 onetoken.one 生成的实际 API 密钥!
> **重要提示**:请将下方的 `sk-xxx` 替换为您在 onetoken.one 生成的实际 API 密钥!
1. 创建目录和文件:
```bash theme={null}
mkdir -p ~/.codex
touch ~/.codex/auth.json
touch ~/.codex/config.toml
```
2. 编辑 `auth.json` 文件:
```bash theme={null}
vi ~/.codex/auth.json
```
按 `i` 进入插入模式,粘贴以下内容(将 `sk-xxx` 替换为您的密钥),然后按 `ESC` 键,输入 `:wq` 并回车保存退出。
```json theme={null}
{ "OPENAI_API_KEY": "sk-xxx" }
```
3. 编辑 `config.toml` 文件:
```bash theme={null}
vi ~/.codex/config.toml
```
按 `i` 进入插入模式,粘贴以下内容,然后按 `ESC` 键,输入 `:wq` 并回车保存退出。
```toml theme={null}
model_provider = "api111"
model = "gpt-5-codex"
model_reasoning_effort = "high"
disable_response_storage = true
preferred_auth_method = "apikey"
[model_providers.api111]
name = "api111"
base_url = "https://onetoken.one/v1"
wire_api = "responses"
```
### 启动 codex
**重启终端!重启终端!重启终端!**
然后进入到您的工程目录:
```bash theme={null}
cd your-project-folder
```
运行以下命令启动:
```bash theme={null}
codex
```
\[图片]
### VSCode 插件 codex
以上配置完成后,在 VSCode 扩展商店中搜索并安装 `codex` 即可。
\[图片]
安装完成后会出现在侧边栏。
\[图片]
## Linux 版本教程
### 系统要求
* 主流 Linux 发行版 (Ubuntu 20.04+, Debian 10+, CentOS 7+, etc.)
* Node.js 22+
* npm 10+
* 网络连接
### 安装步骤
**1. 安装 Node.js**
* **Ubuntu/Debian**
```bash theme={null}
sudo apt update
curl -fsSL [https://deb.nodesource.com/setup_lts.x](https://deb.nodesource.com/setup_lts.x) | sudo -E bash -
sudo apt-get install -y nodejs
```
* **CentOS/RHEL/Fedora**
```bash theme={null}
# 使用 dnf (Fedora) 或 yum (CentOS/RHEL)
sudo dnf install nodejs npm
# 或
sudo yum install nodejs npm
```
* **Arch Linux**
```bash theme={null}
sudo pacman -S nodejs npm
```
**2. 安装 codex**
打开终端 (Terminal),运行:
```bash theme={null}
sudo npm install -g @openai/codex
```
**3. 验证安装**
打开终端 (Terminal),运行:
```bash theme={null}
codex --version
```
### 配置 API
**1. 获取 Auth Token**
访问 [onetoken.one](https://onetoken.one) 站点页面进行以下操作:
* 点击 **控制台 → API令牌** 页面
* 点击 **添加令牌**
* 令牌分组请选择:**codex渠道-gpt**(务必选择此分组,否则无法使用)
* 令牌名称随意
* 额度建议:设置为 **无限额度**
* 其他选项保持默认
\[图片]
**2. 配置文件**
> **重要提示**:请将下方的 `sk-xxx` 替换为您在 onetoken.one 生成的实际 API 密钥!
> **重要提示**:请将下方的 `sk-xxx` 替换为您在 onetoken.one 生成的实际 API 密钥!
> **重要提示**:请将下方的 `sk-xxx` 替换为您在 onetoken.one 生成的实际 API 密钥!
1. 创建目录和文件:
```bash theme={null}
mkdir -p ~/.codex
touch ~/.codex/auth.json
touch ~/.codex/config.toml
```
2. 编辑 `auth.json` 文件:
```bash theme={null}
vi ~/.codex/auth.json
```
按 `i` 进入插入模式,粘贴以下内容(将 `sk-xxx` 替换为您的密钥),然后按 `ESC` 键,输入 `:wq` 并回车保存退出。
```json theme={null}
{ "OPENAI_API_KEY": "sk-xxx" }
```
3. 编辑 `config.toml` 文件:
```bash theme={null}
vi ~/.codex/config.toml
```
按 `i` 进入插入模式,粘贴以下内容,然后按 `ESC` 键,输入 `:wq` 并回车保存退出。
```toml theme={null}
model_provider = "api111"
model = "gpt-5-codex"
model_reasoning_effort = "high"
disable_response_storage = true
preferred_auth_method = "apikey"
[model_providers.api111]
name = "api111"
base_url = "https://onetoken.one/v1"
wire_api = "responses"
```
### 启动 codex
**重启终端!重启终端!重启终端!**
然后进入到您的工程目录:
```bash theme={null}
cd your-project-folder
```
运行以下命令启动:
```bash theme={null}
codex
```
**2. 配置文件**
> **重要提示**:请将下方的 `sk-xxx` 替换为您在 onetoken.one 生成的实际 API 密钥!
> **重要提示**:请将下方的 `sk-xxx` 替换为您在 onetoken.one 生成的实际 API 密钥!
> **重要提示**:请将下方的 `sk-xxx` 替换为您在 onetoken.one 生成的实际 API 密钥!
1. 创建目录和文件:
```bash theme={null}
mkdir -p ~/.codex
touch ~/.codex/auth.json
touch ~/.codex/config.toml
```
2. 编辑 `auth.json` 文件:
```bash theme={null}
vi ~/.codex/auth.json
```
按 `i` 进入插入模式,粘贴以下内容(将 `sk-xxx` 替换为您的密钥),然后按 `ESC` 键,输入 `:wq` 并回车保存退出。
```json theme={null}
{ "OPENAI_API_KEY": "sk-xxx" }
```
3. 编辑 `config.toml` 文件:
```bash theme={null}
vi ~/.codex/config.toml
```
按 `i` 进入插入模式,粘贴以下内容,然后按 `ESC` 键,输入 `:wq` 并回车保存退出。
```toml theme={null}
model_provider = "api111"
model = "gpt-5-codex"
model_reasoning_effort = "high"
disable_response_storage = true
preferred_auth_method = "apikey"
[model_providers.api111]
name = "api111"
base_url = "https://onetoken.one/v1"
wire_api = "responses"
```
### 启动 codex
**重启终端!重启终端!重启终端!**
然后进入到您的工程目录:
```bash theme={null}
cd your-project-folder
```
运行以下命令启动:
```bash theme={null}
codex
```
\[图片]
### VSCode 插件 codex
以上配置完成后,在 VSCode 扩展商店中搜索并安装 `codex` 即可。
\[图片]
安装完成后会出现在侧边栏。
\[图片]
## Linux 版本教程
### 系统要求
* 主流 Linux 发行版 (Ubuntu 20.04+, Debian 10+, CentOS 7+, etc.)
* Node.js 22+
* npm 10+
* 网络连接
### 安装步骤
**1. 安装 Node.js**
* **Ubuntu/Debian**
```bash theme={null}
sudo apt update
curl -fsSL [https://deb.nodesource.com/setup_lts.x](https://deb.nodesource.com/setup_lts.x) | sudo -E bash -
sudo apt-get install -y nodejs
```
* **CentOS/RHEL/Fedora**
```bash theme={null}
# 使用 dnf (Fedora) 或 yum (CentOS/RHEL)
sudo dnf install nodejs npm
# 或
sudo yum install nodejs npm
```
* **Arch Linux**
```bash theme={null}
sudo pacman -S nodejs npm
```
**2. 安装 codex**
打开终端 (Terminal),运行:
```bash theme={null}
sudo npm install -g @openai/codex
```
**3. 验证安装**
打开终端 (Terminal),运行:
```bash theme={null}
codex --version
```
### 配置 API
**1. 获取 Auth Token**
访问 [onetoken.one](https://onetoken.one) 站点页面进行以下操作:
* 点击 **控制台 → API令牌** 页面
* 点击 **添加令牌**
* 令牌分组请选择:**codex渠道-gpt**(务必选择此分组,否则无法使用)
* 令牌名称随意
* 额度建议:设置为 **无限额度**
* 其他选项保持默认
\[图片]
**2. 配置文件**
> **重要提示**:请将下方的 `sk-xxx` 替换为您在 onetoken.one 生成的实际 API 密钥!
> **重要提示**:请将下方的 `sk-xxx` 替换为您在 onetoken.one 生成的实际 API 密钥!
> **重要提示**:请将下方的 `sk-xxx` 替换为您在 onetoken.one 生成的实际 API 密钥!
1. 创建目录和文件:
```bash theme={null}
mkdir -p ~/.codex
touch ~/.codex/auth.json
touch ~/.codex/config.toml
```
2. 编辑 `auth.json` 文件:
```bash theme={null}
vi ~/.codex/auth.json
```
按 `i` 进入插入模式,粘贴以下内容(将 `sk-xxx` 替换为您的密钥),然后按 `ESC` 键,输入 `:wq` 并回车保存退出。
```json theme={null}
{ "OPENAI_API_KEY": "sk-xxx" }
```
3. 编辑 `config.toml` 文件:
```bash theme={null}
vi ~/.codex/config.toml
```
按 `i` 进入插入模式,粘贴以下内容,然后按 `ESC` 键,输入 `:wq` 并回车保存退出。
```toml theme={null}
model_provider = "api111"
model = "gpt-5-codex"
model_reasoning_effort = "high"
disable_response_storage = true
preferred_auth_method = "apikey"
[model_providers.api111]
name = "api111"
base_url = "https://onetoken.one/v1"
wire_api = "responses"
```
### 启动 codex
**重启终端!重启终端!重启终端!**
然后进入到您的工程目录:
```bash theme={null}
cd your-project-folder
```
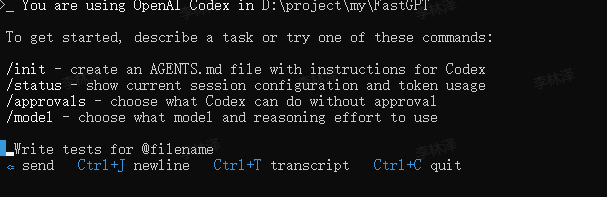
运行以下命令启动:
```bash theme={null}
codex
```
 ### VSCode 插件 codex
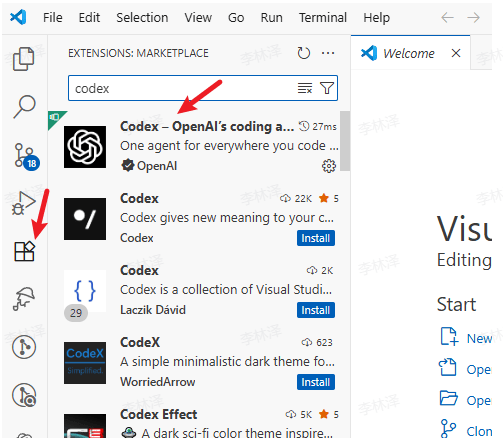
以上配置完成后,在 VSCode 扩展商店中搜索并安装 `codex` 即可。
### VSCode 插件 codex
以上配置完成后,在 VSCode 扩展商店中搜索并安装 `codex` 即可。
 安装完成后会出现在侧边栏。
##
安装完成后会出现在侧边栏。
##  ## 常见问题
**出现错误请按照如下步骤排查:**
1. 确认 API Key 创建是否正确:额度选择**无限额度**,不要限制模型,分组选择 **codex渠道-gpt**。
更多 codex 配置及使用详情请参考 **codex 官方教程**。
## 常见问题
**出现错误请按照如下步骤排查:**
1. 确认 API Key 创建是否正确:额度选择**无限额度**,不要限制模型,分组选择 **codex渠道-gpt**。
更多 codex 配置及使用详情请参考 **codex 官方教程**。